Imagine you’re standing on the shore, early morning mist swirling around your ankles, fishing rod in hand, ready to cast your line into the welcoming embrace of the water. But instead of a smooth cast, you’re fumbling with tangled lines and struggling with a subpar line winder that’s more trouble than it’s worth. Sounds frustrating, right? This is the exact scenario we want to help you avoid. That’s why we’re diving deep into why a durable aluminum line winder isn’t just a nice-to-have, but a must-have for any beginner angler looking to start strong.
The Foundation of Successful Fishing
When you’re new to fishing, every component of your gear matters—none more so than your line winder. Think of it as the foundation of your fishing setup: if the foundation is strong, everything you build on it will be stronger. Aluminum line winders are renowned for their strength and durability, making them an ideal choice for those just starting out. Why does this matter? Because a day on the water can be full of surprises.
The Unseen Challenges of Cheap Winders
Many beginners opt for the cheapest gear, not realizing how quickly poor-quality tools can degrade. Plastic winders can crack, warp, or break, especially under the dynamic conditions of fishing environments. When you’re wrestling with a big catch or dealing with harsh weather, the last thing you want is your line winder failing. Here’s where aluminum steps in—a material praised for its resilience and ability to withstand the elements without succumbing to wear and tear as quickly as other materials.
A Closer Look: What Makes Aluminum Ideal?
Aluminum line winders offer several benefits:
- Durability: They resist corrosion and damage, ensuring longevity and reliability.
- Weight: Aluminum is lightweight, which means it won’t add unnecessary heft to your fishing rod.
- Ease of use: A smoother mechanism means more efficient line management, so you spend less time fighting with your gear and more time enjoying fishing.
How to Choose the Right Aluminum Line Winder
Choosing the right aluminum line winder involves considering a few key factors:
- Compatibility: Ensure it fits with your fishing rod and line type.
- Size and Capacity: Match the winder to the weight and length of line you plan to use.
- Mechanism Quality: Look for a winder with a smooth, reliable mechanism—feel free to ask for demonstrations or read reviews.
The Payoff: More Time Fishing, Less Time Fixing
Investing in a durable aluminum line winder translates into more effective learning and more enjoyable fishing trips. Instead of troubleshooting gear issues, you can focus on honing your technique and catching fish. And as you grow from a beginner into a seasoned angler, a good line winder will continue to serve you well, adapting to new challenges and different fishing conditions.

Step-by-Step Guide to Setting Up Your Aluminum Line Winder
Step 1: Gather Your Equipment
- Fishing rod
- Aluminum line winder
- Fishing line (suitable for your target fish)
- Scissors or line cutter
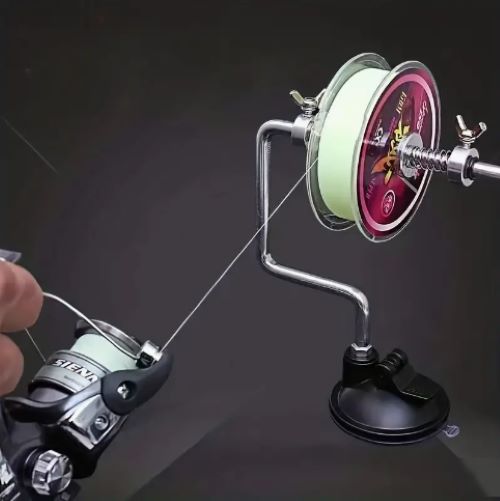
Step 2: Attach the Line Winder to Your Rod
- Securely attach the aluminum line winder to your fishing rod. Most winders will have a clamp or screw mechanism that fits onto the rod. Ensure it’s tightly fixed to prevent any movement during use.
Step 3: Thread the Line
- Take the end of your fishing line and thread it through the guides of your fishing rod, starting from the one closest to the reel and moving towards the tip.
- Make sure the line is not twisted as you thread it.
Step 4: Attach the Line to the Winder
- Open the bail of the line winder (if your model has one) to allow the line to be wound.
- Tie the line around the spool of the winder. Use an arbor knot or another secure fishing knot to ensure the line does not slip.
- Close the bail (if applicable).
Step 5: Wind the Line
- Slowly turn the handle of the line winder to begin winding the line onto the spool.
- Keep even tension on the line with your free hand to prevent it from tangling or winding too loosely.
- Continue winding until you have the desired amount of line on your winder, typically around 100-150 yards, depending on the size of your winder and the type of fishing you plan to do.
Step 6: Cut and Secure the Line
- Once you’ve wound enough line onto your winder, cut the line leaving enough length to work with for tying to your lure or tackle.
- Secure the loose end of the line so it doesn’t unwind. You can use a rubber band or a line clip if your winder has one.
Step 7: Final Setup
- Attach your chosen lure or hook to the end of the line.
- Double-check all knots and connections to ensure everything is secure.
Step 8: Test Your Setup
- Gently pull on the line to simulate a fish pull to test the security of your setup.
- Make any adjustments as necessary.
Setting up your aluminum line winder properly is crucial for a successful fishing experience. With this durable tool, you can focus more on the joy of fishing and less on the hassle of managing your line. Happy fishing!
Ready to Cast Your Line?
Starting your fishing journey with the right gear sets you up for success and spares you a lot of frustration. An aluminum line winder is a cornerstone piece that supports not just your immediate fishing needs but also your long-term development in the sport. So why wait? Equip yourself with the tools that let you focus on what really matters—making those memorable catches and enjoying every moment by the water.
Every cast you make is a learning opportunity, and every piece of equipment is part of your journey. Make sure your journey starts with the best possible support. Happy fishing!
For your information: This content features affiliate links from Temu. This means I may earn a commission if you make a purchase through one of these links. However, my main goal is to share useful information and recommend products I believe you’ll find helpful.


1 Response
[…] with a Vacuum Suction Base and Adjustable Tension if you would like more information please click here. Just note you will be leaving this […]